A great website not only has high-value content but also has a creative layout with the right images. When people are browsing, their eyes are the first to be attracted. Therefore, images play a key role in a website. Images also reflect the quality and professionalism of a website. Optimizing the images of a website can be improved and enhanced. How can we optimize images for a better user experience?
Why We Need Image Optimization
=> Improve page loading speed
The loading speed of your website is a key factor in retaining users. The size of the images is an important factor in the loading speed of your website. The smaller the image, the faster it will load. Improve your website loading speed by optimizing your images in this way. We need to ensure that the image is as small as possible without losing the quality of the image within the appropriate limits of the web.=> Attract users with high-quality images
The quality of the images also reflects the overall quality of a website from the side. High-quality images can enhance the user experience and leave a lasting impression. When browsing, users will see thumbnails of some websites in the search results, and some users will be attracted by these thumbnails and click on the website.=> Get the better SEO results
Google will read the content of the image to identify the image. The stronger the image's relevance to the subject, the more information matching and the more likely to be included. Get better SEO results for your website.=> Save storage space
The smaller the image file, the less storage space it takes up and the less bandwidth it consumes. The smaller image saves some money for storage space. The convenience of small images is that you can create backups and transfer them quickly at any time.How to Optimize Image
=> Image Naming
In addition to the content of the image, the naming of the image should not be ignored. When naming, choose descriptive keywords related to the image's content and hyphenate them separately. Remember to put the target keywords at the beginning to promote Google's inclusion of the images.=> Image Size
The website's overall competitiveness is improved by matching the web page with the right image size to display the image's effect better, for example, in terms of loading speed and visual effect. The right size will also give users a better experience and make them enjoy browsing the site and staying with it.=> Image Format
You can choose the appropriate file format according to your needs. For example, if you have already resized the image and it is still not small enough, you can change your mind by converting it to a file format.- JPEG or JPG formats are suitable for images with diverse colors.
- For simple illustration types, you can choose PNG, but PNG has a larger file size.
- GIF is suitable for animated images with lossless compression. Gif format works best for this purpose.
- Webp is a smaller format than images of the same quality, which makes it easier to improve the loading speed of web pages. It supports both lossy and lossless compression.
=> Image Quality
We need to make the images as clear as possible without affecting the page's loading speed, which ensures that the visual experience and sense of the user's use are not reduced. High-quality images can provide more information and represent the quality of the website. If your picture is not quality enough, you can quickly upscale image using Image Upscaler.3 Practices to Optimize Images for the Web
When you think of image optimization, what methods come to mind? With advances in technology, some online tools can do image optimization. For example, image compression, format conversion, and image quality enhancement. Let's take a look together.Image Compression: Tinypng
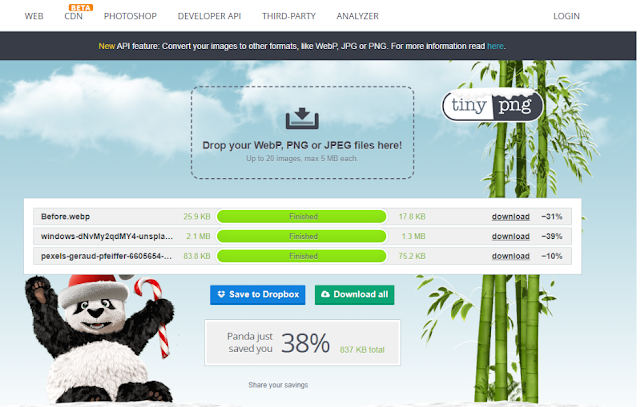
Tinypng is a user-friendly web image compression tool that can support processing up to 20 images at a time. You can use Tinypng to reduce file size while preserving image quality. The optimized images are smaller, improve web page loading speed and take up less storage space. It is free to use and supports WebP, JPEG and PNG formats.=> How to Use
Step 1: Click or drag and drop to upload an image to the box at the top of the page.
Step 2: Wait for the compression to complete, then click "Download" to view and save.
Image Format Converter: Anywebp
Anywebp is a flexible image format converter. You can convert webp format images to Png, Jpg, or ico. It also supports converting png, jpg and other images to webp format. The most attractive feature is its batch operation function, which greatly frees up our hands and allows you to convert many image formats with just a few simple clicks. You can optimize and get the image format you want by using it.=> How to Use
Step 1: Click the colorful flower icon or drag and drop to select the image in the box.Step 2: Select the "Start" or "Convert All Image" purple button to start processing.
Step 3: Wait a few seconds for the processing to finish. The status will show "Completed", and the download will be completed automatically. You can view it in the folder.
Image Quality Improvement: Imgupscaler
Imgupscaler is a user-friendly image quality upgrader. You can choose whether to enlarge the image 2x or 4x. Using the latest AI algorithms, it recognizes the uploaded images, analyzes the layers and intelligently predicts and fills in the missing pixels after enlargement. It supports batch operation, and you can process images in batches. The batch function simplifies the operation process and also increases efficiency. Optimize and upgrade the image quality by Imgupscaler to get high-resolution images.=> How to Use
Step 1: Drag and drop or click the purple button to upload the image.Step 2: Select the "Start" or "Convert All Image" purple button to start processing.
Step 3: The process will be completed in a few seconds, and a green "Download" button will appear for you to download and view the result.


No comments:
Post a Comment