Are you looking for an effective method to import OLM to Office 365? If your answer is yes, don’t fret. This blog describes some effective ways to import OLM file to Office 365 without any trouble.
Outlook for Mac creates the OLM files for storing vital data such as emails, calendars, contacts, journals, notes, and more. However, in this era, users often tend to transfer their crucial files to SaaS-based email services such as Office 365. Though, Office 365 is a renowned application developed by Microsoft that offers advanced features to its users.So, if you also wish to migrate your OLM files into Microsoft 365, just check out this post. But before proceeding with the approaches, let’s know why users need to migrate OLM to Office 365 first.
Why do Users Need to Migrate OLM to Office 365?
Under various situations, users are searching for a method to import the Mac OLM files to Microsoft 365 or Office 365 mailing platform as it offers the below benefits:- Improved security, productivity, and compliance
- Outlook for Mac doesn’t have features like message recall, Ignore & Clean Up activities, voting buttons, etc.
- Better collaboration
- It’s impossible to manage the lists of Exchange Server distribution with Outlook for Mac.
- Constant patches & updates
- Better Accessibility.
Ways to Import OLM Emails to Office 365
Follow the step-by-step methods to import OLM to Office 365 effortlessly.Way 1- Use IMAP Account to Convert OLM to PST
If you are currently using the webmail services with Outlook for Mac, you can easily migrate Mac Outlook files to Office 365. By following the below steps, you can easily execute this task.Step 1- Set up the IMAP Account
The first crucial step that you need to take is to set up IMAP account in the Gmail & then configure it within Mac Outlook.- Initially, log in to your Gmail >> click on Settings.
- After that, click on the tab “Forwarding and POP/IMAP.”
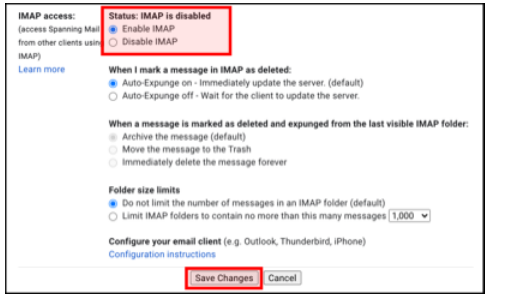
- Then, in the section of IMAP Access, you have to click on the Enable IMAP.
- Next, click the Save Changes to save the changes. And an IMAP account is successfully set up.
Now, let’s follow the below steps to configure the IMAP account in Mac Outlook.
- Simply open the Mac Outlook.
- Navigate to the Tools >> Accounts.
- Then, add the Gmail IMAP account by clicking on + (plus) sign.
- At this time, you have to provide the required info about the Gmail IMAP account.
- After this, click the Add Account.
- Now, the IMAP account is successfully configured with the Mac Outlook.
Step 2- Create Label to Synchronize Mac Outlook & IMAP
Once configured with the Mac Outlook, you have to create a label in the Gmail for synchronizing & then move the OLM file to a configured IMAP account.Here are the comprehensive instructions to do this:
- Again, you have to open the Gmail account >> click on the Settings >> Label.
- Next, click on the Create new, this will generate a new label. After this, enter the label name >> click OK.
- Then, open Outlook for Mac >> click on the option “Send/Receive” to start the synchronization process.
- Wait until the data transferring process gets over.
Step 3- Configure IMAP into MS Outlook & Import Outlook for Mac Data to Microsoft 365
In the final stage, you have to go to the Account Settings for configuring the Gmail IMAP account in Microsoft Outlook. Then, submit the Gmail details & add new IMAP account into MS Outlook.After configuring the MS Outlook & IMAP account, you can migrate the files to Office 365. For this, you have to use Azure AzCopy software. Using this software, one can successfully transfer the Mac Outlook data to Office 365. But remember, this procedure is quite complex and long too.
The drawback of Manual Ways
Here are some of the limitations of manual ways:- The manual tactic is lengthy as well as time-consuming.
- Using a manual way, one can import only mails from the OLM file to Office 365.
- There is a huge chance of data loss while the transfer process.
Way 2- One-Stop Solution: Use the Stellar Converter for OLM Tool
To overcome the drawbacks of the manual solutions stated above, you can use the proficient Stellar Converter for OLM software. This program can efficiently convert OLM to PST or other formats such as HTML, EML (for email), PDF, RTF, and MSG (for messages).The best part about this tool is- it can convert the oversized OLM files with less effort.
So, all you need to do is to download & install the software on your Windows PC & follow the below steps to import the Mac OLM files to Microsoft 365 or Outlook 365:
Note: Before starting the conversion process, create an OLM file for Outlook for Mac and Copy to Windows OS.
Step 1- Once the software is installed successfully, launch it. Then, Browse the OLM file that you want to import. If you don’t know the file location, simply click on Find option to find it. Now, the program shows the files list with .OLM extension.
Step 2- Next, click on Convert button. This will begin the scanning process.
Step 3- After completion of the scanning process, the program shows the mailbox stuff for preview. Check the content of mailbox & click Save option.
Step 4- The converted files will be saved to a preferred location as PST. Instead, the files will be also imported to Microsoft 365 or Office 365 directly with Technician version of the tool.
Step 5- Specify the required login details of the Office 365 for importing OLM emails into Office 365.
Step 6- When the process gets over, a ‘Message Completion’ popup status appears on your screen. At last, click OK.
Time to Close
After going through this blog, you must have got enough info about how to import OLM to Office 365 effortlessly.However, if you want to migrate from Mac Outlook to Office 365, then you need to simply convert Mac OLM file into PST. Using the techniques mentioned overhead, you can easily perform this task.
But, if you want a safer way to perform this task, it is recommended to use the automatic way- Stellar converter for OLM tool.
I hope you liked this post.


No comments:
Post a Comment