In today's digital age, virtual meetings have become an integral part of our work and personal lives. Microsoft Teams is a popular platform for conducting online meetings, and sometimes you may find it necessary to record these meetings for future reference or share them with others. Here are 2 easy methods on how to record a Teams meeting you can use. Whether you need to record a Teams meeting for official purposes or want to keep a personal record of important discussions, these methods will help you achieve your goal.
Record a Teams Meeting with Apeaksoft Screen Recorder - A Versatile Solution
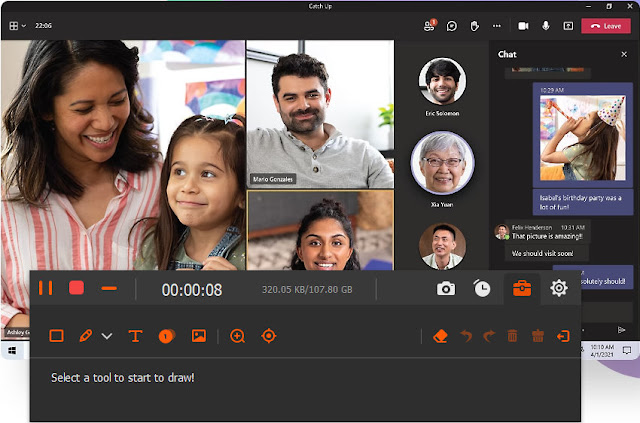
If you prefer a more feature-rich and customizable recording experience, Apeaksoft Screen Recorder is an excellent choice. It offers advanced options for recording Teams meetings with ease. You can use this software to record Teams meeting with the system sound, microphone sound, and webcam. Apart from that, this screen recorder also allows you to mark anything you need during recording. Moreover, it can help you record your phone screen, which means you can screen record facetime on any devices.Step 1. Firstly, you should go to the official website of Apeaksoft Screen Recorder to download and install it on your device.
Step 2. Then run the software and choose the Video Recorder option on the main interface.
Step 3. Before starting the recording, adjust the recording area by dragging the frame to cover the Teams meeting window or the desired region of your screen.
Step 4. Enable the audio recording options according to your preference. You can choose to record system audio, microphone input, or both.
Step 5. Once everything is set up, click the REC button to start recording the Teams meeting.
Step 6. During the recording, you can use the annotation tools provided by Apeaksoft Screen Recorder to highlight important points or make notes on the screen.
Step 7. When the meeting finishes, please click the Stop button to complete the recording. And then the recorded video will be saved to your preferred location on your computer.
Record Meeting with Built-in Recording Feature in Teams
Microsoft Teams offers a built-in recording feature that allows you to capture your meetings directly within the application. Here's how to use it:
Step 1. Start the Teams meeting by joining or initiating the session as usual.
Step 2. Once the meeting has started, look for the control bar at the top of the screen. You'll find several options, including Meeting controls and More actions.
Step 3. Click on More actions, represented by three dots (ellipsis), and choose the Start recording option from the drop-down menu. A notification will appear for all participants, indicating that the meeting is being recorded.
Step 4. Throughout the meeting, Teams will record both audio and video, capturing the shared screen, presentations, and any other content being displayed.
Step 5. When the meeting concludes, click on the More actions button again and select Stop recording to finish the recording.
Note: Recording meetings in Teams may be subject to your organization's policies and settings. Make sure you have the necessary permissions to record meetings, and be mindful of privacy and data protection regulations when recording and sharing meeting content.
Here's a comparison table highlighting the differences between the Built-in Recording Feature in Teams and Apeaksoft Screen Recorder for recording a Teams meeting:
While the Built-in Recording Feature in Teams is convenient and readily accessible, Apeaksoft Screen Recorder offers more control, flexibility, and advanced features for a richer recording experience. You can pick the solution that best suits you.


No comments:
Post a Comment